Help · Workshop tools
How operations work
A workshop tool doesn’t just change the shape of a part: it adds a step to the part’s history, called an operation. You can come back to any step later, change it in the same window you made it in, or remove it. The steps keep working when the part is resized.
Where the tools are
The workshop tools — Saw, Drill, Mill, the jigsaw, Lathe, Bend and Press — are on the toolbar at the top left of the scene. They are shown only when ☰ → Advanced tools is on; turning it on in AI mode switches the studio to the Editor. The buttons that merge and subtract parts are in the Geometry block of Properties, also with Advanced tools.
The Operations block
Select a part and open the Operations block in Properties (right panel). It is shown with Advanced tools on and lists the part’s steps in the order they are made, for example Cut 3 mm, through or Hole Ø8, 12 deep. A part with no steps says No operations.
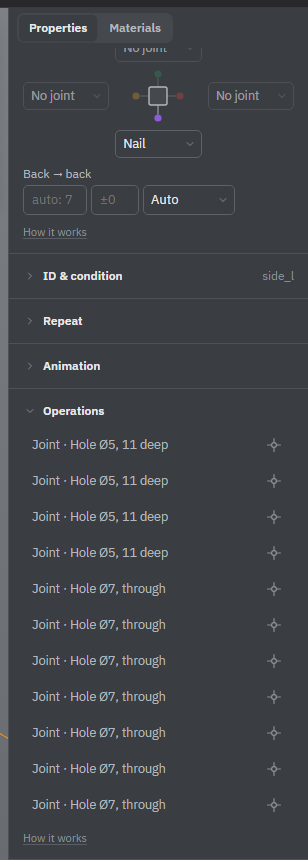
- Point at a row to highlight what it removes on the part.
- Click a row to open it in the tool that made it, with all its settings.
- Click the bin (Remove operation) to remove the step. The material comes back, and the later steps are made again without it.
- ƒ after a name means the step has formulas.
- Rows that start with Joint are holes for fasteners and connectors. They follow the joint and can’t be changed here: change the fastener or the connector instead.
- Each bend and each twist has a row of its own. A mitre row opens the Mitre block.
- A red row with Not applied is a bend or press that can’t be made on the part as it is now. The reason is written under it.
Each step you make or change is one step of the studio’s history, so Undo (Ctrl+Z) takes it back.
A cut that split a part into pieces can’t be changed or removed while the other pieces exist: each piece is a part of its own now. Delete the other pieces first.
The tool window
Every tool opens the same kind of window. The saw, drill, bend and press take the place of Properties in the right panel. The mill, lathe and jigsaw open full screen, with a drawing in the middle. From top to bottom:
- The step line says what to do next, for example Click a shape to mark the cut. If something can’t be done, the reason shows there or in a line at the bottom of the scene.
- The main fields: size, depth, distance to the edge.
- The result line: what you will get, such as the two pieces after a saw cut or the flat blank of a bend.
- Folded sections for rarer settings, such as Repeat. A section opens by itself when something in it is set.
- Cancel (Esc) leaves the part as it was. The action button — Cut, Drill, Bend, Press or Apply (Enter) — makes the step.
The same window opens when you click a step in the Operations block. Its title then says Edit cut, Edit hole and so on, the part is shown without that step, and the button is Apply (Save for the press). After the change the step stays in its place in the list.
Repeat and stretching
A row of holes or a set of grooves is one step with a repeat: the Repeat section of the tool window makes copies along a line, around a circle or as a mirror image. See Repeat inside a tool window.
When you resize a part, its steps are made again at their own sizes: a hole stays round and the same diameter, a cut stays straight and at the same angle. Where each step goes is set in the same section under When stretched, for each of the part’s own axes X, Y and Z:
- Auto — decided by where the step is: near an edge it keeps its distance to that edge, in the middle it stays in the middle, over the whole length it stretches with the part. The drop-down shows what Auto chose.
- To start or To end — keeps its distance to that end of the axis, like a hole 37 mm from the end.
- Middle — stays in the middle.
- Stretches — grows with the part, like a groove along its whole length.
The mill has the same choice in the words of its drawing. A turning and a jigsaw outline always stretch with the part.
Formulas in tool fields
Size, depth and distance fields take a formula as well as a number. =T/2 is half the thickness of the part; =L-37 is 37 mm short of its length. L, W and T are the part’s length, width and thickness, and project variables work too. The formula is kept in the step and worked out again each time the part is resized. If you then drag the tool by its points, the field gets a plain number and the formula is gone.
Steps are made by the geometry engine, which loads in the background when the studio opens. If a tool says it is still loading, try again in a moment. Locked parts and copies of a project part can’t be cut: change the part itself.
See also: Repeat, Variables and formulas, Saw, Project parts and My parts.