Help · Getting started
The studio at a glance
The studio has a header on top, the scene in the middle and two panels at the sides. This page names each area, so the rest of the guide can tell you where a control lives. What you see depends on the mode: in AI mode the panels are hidden (see AI and Editor modes). The page describes the Editor.
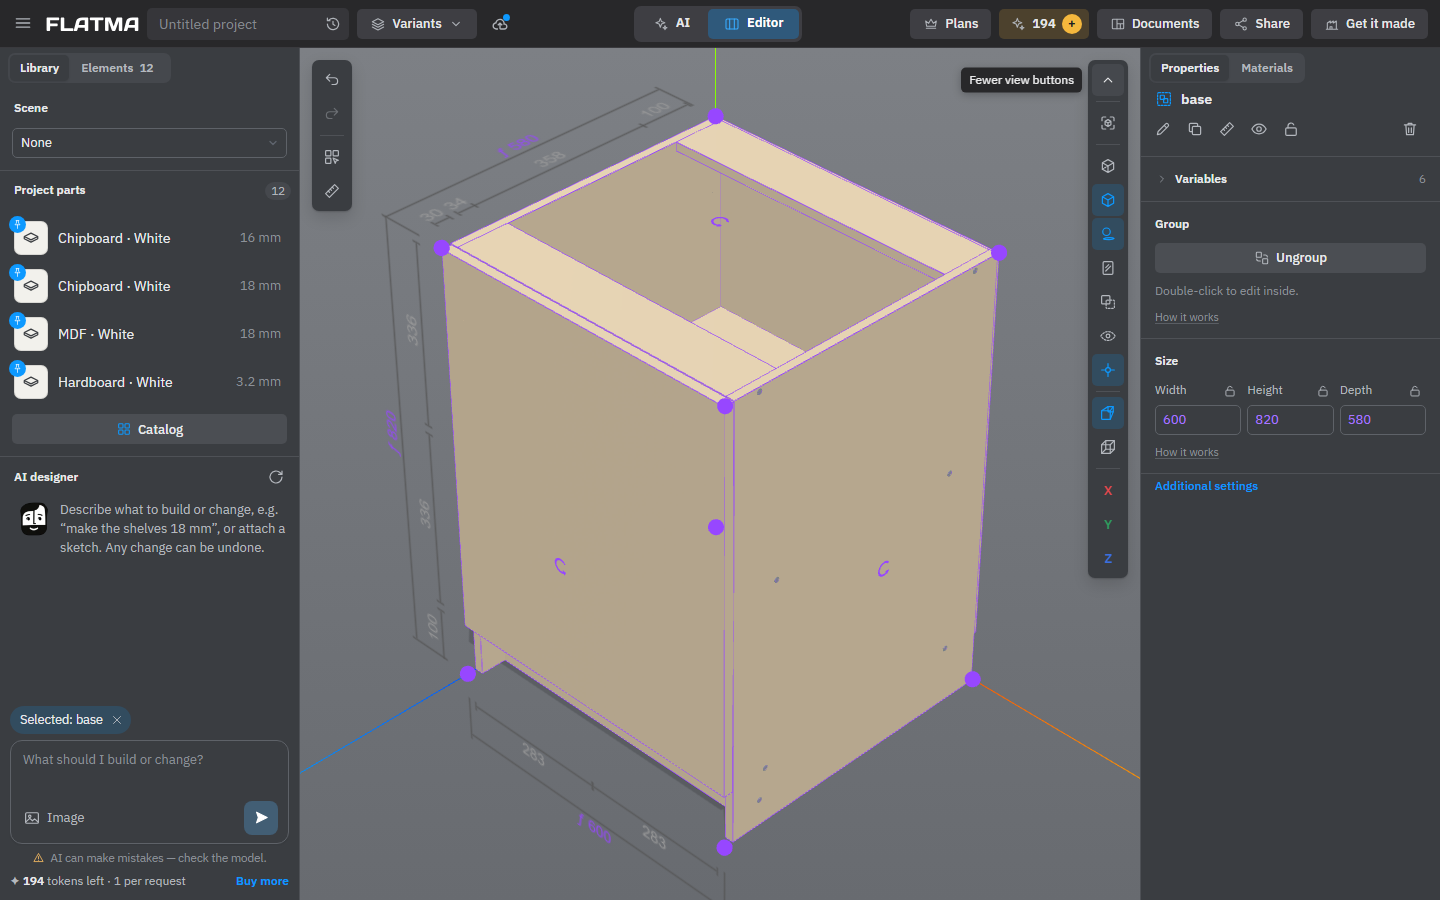
Header
From left to right:
- ☰ — the menu (below).
- The project name field. Click it to rename the project.
- The clock inside the name field — Version history: earlier saved versions of the project, with Restore.
- Variants — alternative versions of the same project with their own links. See Project variants.
- The cloud — Save now (Ctrl+S). The text next to it tells you whether everything is saved. On the Free plan a Public badge reminds you that saved projects are public.
- Remarks — appears when clients have left remarks on the project.
- In the middle — the switch AI | Editor.
- Plans — plans and prices in a window, without leaving the project.
- The AI tokens button (“✦ 12 AI tokens +”): click it to see your balance and buy more. Without an account it reads Get 3 free AI tokens.
- Documents — cutting maps, drawings and downloads: PDF, DXF, STL, part labels.
- Share — a view-only link to the project.
- Get it made — makers in your city who can make this project.
- Assembly — only when you open a project by a view-only link: find a part by its number or name and see where it goes.
On screens narrower than about 1200 px the buttons on the right show only their icons. Hover over one to see its name.
Left panel: Library and Elements
The Library tab is where parts come from:
- Scene — None, Floor or Room around your model, with buttons for the room plan and to hide the walls. See Floor and room.
- Project parts — what you have used in this project, the latest first. Click a row to put the part on the scene, or drag it onto the floor.
- Catalog — ready parts and models by section, your own parts (My parts) and projects from Flatma community.
- AI designer — the chat, at the bottom of the tab.
The Elements tab lists everything on the scene as a tree, with a count. Click a row to select it, use the eye to hide it, drag rows to move parts between groups. See The Elements list.
Scene toolbar
At the top left of the scene: Undo and Redo, Select several (click parts one by one to add them to the selection) and Measure. With ☰ → Advanced tools on, the workshop tools join them: Saw, Drill, Mill, Jigsaw, Lathe, Bend and Press. See How operations work.
View buttons
On the right of the scene. At first only a few are shown: the arrow More view buttons, 3D perspective and the views along X, Y and Z. The arrow opens the rest: show the whole model, contour mode, edges, shadows, mirror reflections, half-transparent parts, see-through near the camera, fasteners and the orthographic view. See Camera and views.
Right panel: Properties and Materials
Properties shows the settings of what is selected: its name and actions (Rename, Duplicate, Dimensions, Hide, Lock, Delete), Size, and below it the blocks for that kind of part, such as Edge banding or Fasteners. At the end, Additional settings opens Position, Rotation, Offsets and Animation.
With nothing selected (click empty space), Properties shows the project: Overall size of everything on the scene, Clear scene, Check intersections and AI render.
Materials shows one card per material of the project, or of the selection. Click a card to change the material, its decor or its edge band. See Materials and decors.
The ☰ menu
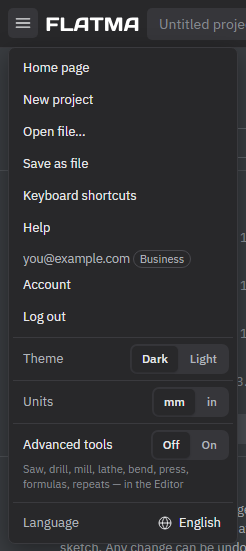
- Home page and New project — an empty studio.
- Open file… and Save as file — the project as a .flatma file on your computer. Paid plans; a crown shows while your plan doesn’t include it.
- Keyboard shortcuts — the list of keys and mouse actions (also ?). See Keyboard and mouse.
- Account (or Log In) — your projects, your parts and settings.
- Theme — Dark or Light.
- Units — mm or in. Lengths on screen and in fields follow it; inches are shown as fractions down to 1/16.
- Advanced tools — Off or On: the workshop tools, formulas and repeats in the Editor.
- Language — the language of the studio.
On a phone
- The studio always opens in AI mode. The chat is a window over the scene; its arrow folds it into a round AI designer button.
- The header takes two rows: menu and buttons on top, the project name, Variants and the cloud below.
- Version history, Plans and the Mode switch move into the ☰ menu.
- In the Editor the panels slide in from the sides. Open them with Elements and Properties at the bottom of the scene; Tools shows the scene toolbar and the view buttons.
- Windows open as sheets from the bottom of the screen.
See also: AI and Editor modes, Camera and views, Keyboard and mouse, Your first project.