Help · Materials, edges and fasteners
Fasteners and hardware
A fastener belongs to one edge of a part and goes into whatever that edge touches. You pick the kind; Flatma finds the joint, works out how many and where, and drills the holes in both parts. Move or stretch the parts and the fasteners follow.
How fasteners work
Fasteners are set on the four edges of a sheet, in the Fasteners block of Properties. The block appears when the sheet touches another part. A joint is an edge against another part, square to it, with a gap of up to 1 mm.
It belongs to the edge that goes into the other part: a confirmat or a cam lock to the end of the shelf, not to the side panel; hinges to the edge of the door.
- Move the part and the holes move with it; stretch it and the count is worked out again. Rows of cam locks follow the 32 mm system.
- Take the neighbour away and the holes go; the kind stays chosen and comes back with the joint.
Bars, profiles, turned parts and shapes have no Fasteners block: join them with a fastener in a drill hole (below).
Choose a fastener for an edge
- Select the sheet, for example a shelf.
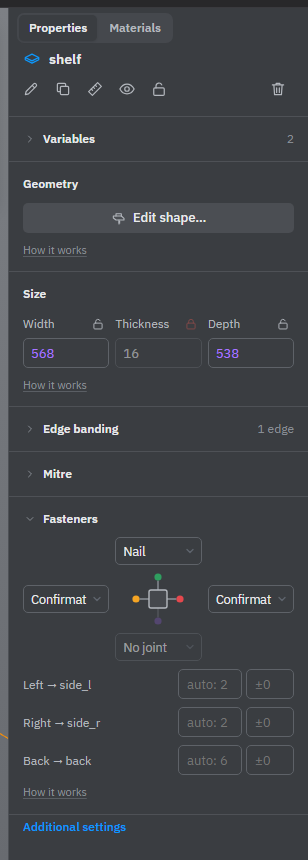
- In Fasteners, click the field of the edge. The fields stand in a cross around a picture of the part; point at one to see what the edge touches. An edge that touches nothing reads No joint.
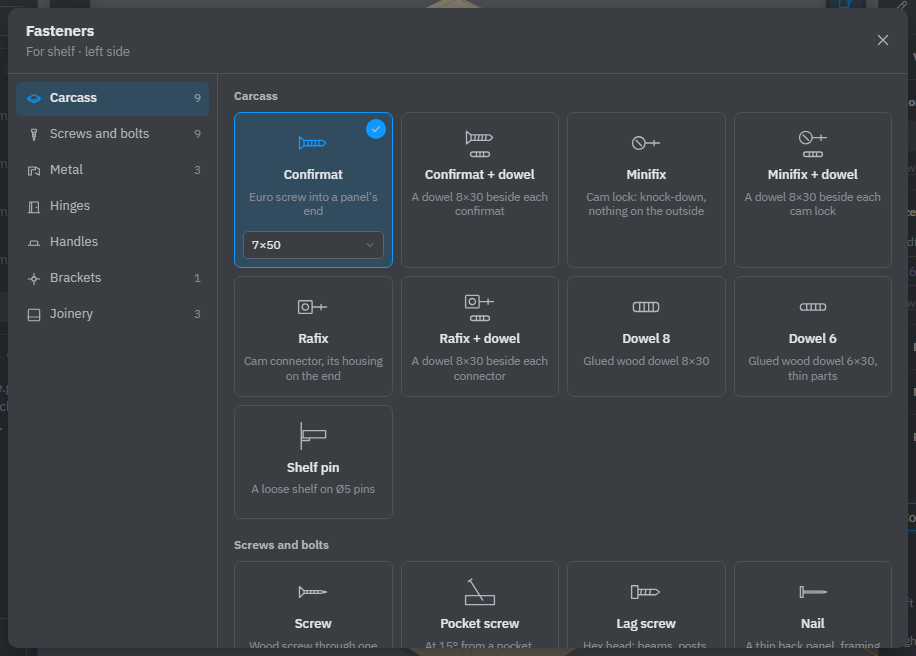
- The fastener catalog opens for this edge, in sections: Carcass, Screws and bolts, Metal, Hinges, Handles, Brackets, Joinery. Click a card: the fastener is set and the window closes.
- A pale card has nothing to hold on this edge. Click it, and the line at the bottom of the window says what it needs.
- A ticked card is the fastener on this edge now: click it to take it off. Shown orange, it is chosen but not installed, and its tooltip says why.
- A card with a size list, such as the confirmat or the screw, lets you pick a size; Auto lets Flatma choose.
Count, shift and face
Under the cross, each fastened edge has a row: the edge, what it joins, and its settings.
- The first field is how many. Empty means by the length of the joint, and it shows the result, such as "auto: 3". For box joints and dovetails it is the number of fingers or tails.
- The ±0 field shifts the whole row along the joint. A row doesn't step around other holes by itself: if two fasteners clash, for example with a hinge plate, shift one of them.
- A cam lock (minifix, rafix), a cross dowel, a pocket screw or a bracket goes on one of the part's two faces. Pick which; Auto shows the face it takes now.
- With Advanced tools on, a size list shows the size Flatma took and lets you pick another.
Hinges and cut-out handles
Hinges go on a door whose back face lies against the front edges of the carcass. Select the door and choose Hinge on the edge where the hinges go. Butt hinge and Piano hinge join a lid or a door to the part it lies on, both ending flush at the hinge edge.
The Handles section holds handles cut into the front itself: 45° grip, Edge notch, Trapezoid slot, Rounded slot and Finger hole. They go on the outer face of a door or drawer front, near the edge you clicked.
Joinery
For a groove, a tenon or a dovetail, model the part at its full size and let it reach into its neighbour: a drawer bottom into the sides by the groove depth, a rail into the leg by the tenon length. The kind on the edge that goes in cuts the joint in both parts. Half lap needs two parts of about the same thickness crossing each other.
Slides, hangers, rail holders and handles
Drawer slides, cabinet hangers, wardrobe rail holders, legs and screw-on handles or knobs are not fasteners but parts in the Library catalog. Drag one onto a face of a part: it sits on the face, slides along it, drills its holes into the part and follows the part when it moves, stretches or opens. Nothing resizes a drawer for its slides: leave the gap yourself.
When a fastener can't be installed
A fastener you chose is installed as you chose it, unless its holes can't be drilled: a part is locked, the other part is a repeat copy whose original has no such hole, or a hinge finds no joint that suits it, for example after the door was moved. It then stays chosen, but has no holes and is not in the parts list or the drawings.
- In the scene it is drawn red where it would stand. Point at it to read why; click it to select its part.
- The edge in the Fasteners block gets a ⚠ and a line with the reason.
- With nothing selected, Fasteners not installed lists them all under Check intersections; click a line to select the part. The same list is in the Documents and download windows.
Fasteners in a drill hole
With Advanced tools on, the drill can hold a fastener — a screw, nail, bolt, rivet, confirmat, threaded insert, cross dowel, shelf pin and others. This is how you join bars, profiles and other parts without a Fasteners block.
- Open the drill on the part and place the hole.
- Click the Fastener field and pick a card. The drill makes the hole the fastener needs, and the part behind gets its hole too.
- Use the drill's repeat for a row of them.
An orange card won't be installed where the drill is now — nothing behind the part, too short or too long, its hole would come out of the second part — but you can still choose it; its tooltip says why.
Show or hide fasteners
Turn Show fasteners on or off among the view buttons on the scene (open them with More view buttons). Fasteners inside parts are easier to see with All parts half-transparent.
When Flatma or the AI chooses fasteners on its own, it keeps screw heads and confirmats off the faces you see, such as door fronts and tops. A fastener you pick yourself goes exactly where you put it. Check the drawings before you drill.
See also: Drill, Connectors, Check intersections, Drawings.