Help · Checking and documents
Downloads
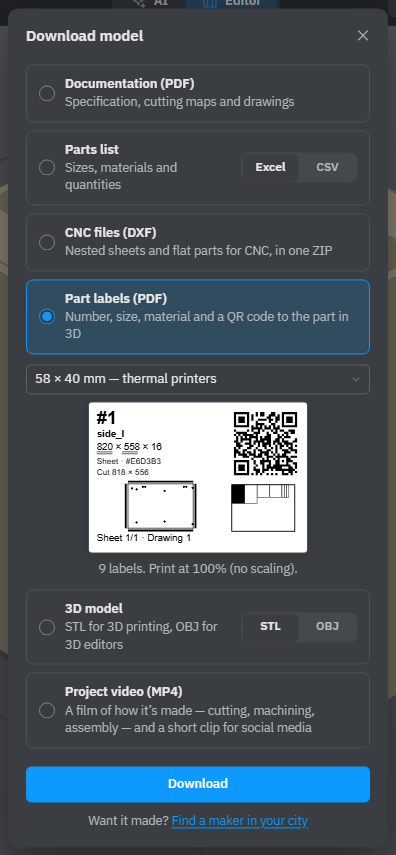
The Download model window gives you everything the workshop needs: the documentation, the parts list, files for CNC machines, part labels, a 3D model and a video of how the project is made.
Open the Download window
- Click Documents in the header.
- Click Download at the top of the Documents window.
- Pick a row, and a format where the row offers two, then click Download at the bottom.
Everything is made from the model as it is now, with the same part numbers as on the cutting maps and drawings. Sizes in the PDF files and the parts list are in your units (☰ → Units); the CNC files and 3D models are always in millimetres. If some chosen fasteners aren't installed, a warning at the top of the window lists them: they have no holes and are not in the files (see Check intersections).
Documentation (PDF)
One PDF file, A4 landscape, in three parts:
- Specification — for each material, its colour, thickness, sheet size, how many sheets the cutting takes and the edge band in metres, then all its parts. Dashes under a length or width mark edge banding: one dash — one side, two — both sides. After the sheets come profiles, shapes, fasteners and the things to buy.
- Cutting maps — a summary with the cutting settings, then a page for each sheet with the parts' numbers, cuts, edge banding and offcuts, and a list of the parts on it. Identical sheets share one page marked with how many. Profiles are shown bar by bar.
- Drawings — the same drawings as in the Drawings section of the Documents window, one per page.
On the Free plan the PDF carries a line saying it was made in Flatma, with the author and a link to the project's public page.
Parts list (Excel or CSV)
A table of all parts: number, name, kind, material, length, width, thickness, profile section, cut size, edge banding and its length, grain, holes per part, quantity and notes. Bought items and fasteners follow as their own tables; in Excel they are separate sheets.
- Excel keeps numbers as numbers in any language. Choose it if you are not sure.
- CSV uses the separator and decimal mark of your browser's language. If your spreadsheet shows everything in one column, its settings differ: use Excel instead.
CNC files (DXF)
One ZIP archive for routers, lasers, plasma and water-jet cutters and drilling machines, everything at 1:1 in millimetres:
- a DXF file for each kind of sheet part, viewed on the face with more machining, with the number of copies to cut in the file name. A part with work on its other face gets a second file for that side;
- when the machine in the Documents window is CNC router, a DXF file for each sheet, with the parts in their places as on the cutting maps;
- a README file with the list of layers and parts, and with the work the flat files can't show, such as holes in the edges of panels.
Each kind of work is on its own layer — outer contour, cut-outs, holes of each size and depth, pockets, chamfers, bend lines — so you can give each layer its tool in your CAM program. Profiles and bent tubes are not in the DXF files; use their drawings.
Part labels (PDF)
A label for every part, with its number, size, material and a QR code that opens the part in 3D. Choose the Label size under the row: common label-printer sizes, or an A4 sheet with 3 or 4 columns to cut apart. A preview of the first label and the number of labels appear below. Print at 100%, without scaling. See Part labels and assembly.
3D model (STL or OBJ)
- STL — for 3D printing and slicers.
- OBJ — for 3D editors. Each part is a separate object named by its number and name, as in the documentation.
Only visible parts go into the file, in their places in the model. Doors and drawers are exported closed, even if they are opened by an animation at that moment. Measuring lines, sizes and the room are not exported.
Project video (MP4)
A film of how the project is made: cutting, every machining step, assembly. It opens in a new tab. Choose Instructions for the whole making or Social for a short clip of the finished project, then the size and speed, and click Record. The video is made right in your browser, frame by frame: keep the tab open until it is done. You can also open the film from the Share window.
Who can download what
- In your own project you can download everything. Part labels and the video need an account and a saved project, because their links open the project.
- On the Free plan projects are saved by publishing them. If yours isn't published yet, Download first opens Publish project with the button Publish and download. See Publishing.
- By a view link, people can download the Documentation (PDF) and Part labels (PDF) only if you ticked Allow downloading documentation (PDF) in the Share window. Without it they don't see Documents at all. See Sharing and remarks.
The project file (.flatma) is not in this window: it is in the ☰ menu, Save as file (see Saving and versions). At the bottom of the window, Find a maker in your city opens Get it made.
See also: Cutting maps, Drawings, Part labels and assembly, Get it made.