Help · Parts and assembly
Sheets, profiles and shapes
Every part in Flatma is made of one of three kinds of material: a sheet, a profile or a free shape. The kind decides how the part stretches, which tools and blocks it gets and how it appears in the documents.
The three kinds
You add each kind from Catalog → Free shapes (or from its row in Project parts). The icon next to the name at the top of Properties shows which kind is selected.
| Kind | Use it for | Stays fixed when you stretch it |
|---|---|---|
| Sheet | Panels cut from a board: chipboard, MDF, plywood, glass, sheet metal | The thickness |
| Profile | Anything sold by length: tubes, bars, rods, angles, mouldings | The section; only the length changes |
| Shape | Anything else: a block you cut, drill, mill and turn into the form you need | Nothing: all three sizes stretch |
Sheet
A sheet is cut from a full board. Its thickness belongs to the material: change it in the Materials tab, not by stretching. A part can't grow bigger than the board it is cut from; the studio stops the size there and says so.
Only sheets get the blocks that panel work needs:
- Edge banding — for sheets 5 mm thick and more. See Edge banding.
- Fasteners on each side — dowels, confirmats, cam locks and more. See Fasteners and hardware.
- Mitre — angled ends, on a sheet with a rectangular outline. See Mitred ends.
- Edit shape… — the outline by points (jigsaw). See Jigsaw and bar section.
In the documents, sheets go onto the cutting maps, and a sheet with holes or other work gets its own drawing.
Profile
A profile is a section pulled along a length, cut from a bar of stock length. The section is the material: pick it in the Materials tab (round tube, square tube, angle, channel and others) or draw your own with Edit section…. Stretching changes only the length. In the documents, profiles appear as lengths to cut from bars, with a drawing when they have cuts or holes.
Shape
A free shape starts as a plain block. It has no stock size of its own: you make its form with the workshop tools. Its material is only its look — a name, a colour, a surface. In the documents, a shape gets a drawing with three views and an isometric view.
The workshop tools — saw, drill, mill, lathe, bend and press — work on every kind of part. They appear on the scene toolbar when ☰ → Advanced tools is on. See How operations work.
The Geometry block
Select a part and look for Geometry in Properties. What it holds depends on the kind:
- For a sheet — Edit shape…: move the points of the outline, bend edges into arcs, add cut-outs.
- For a profile — Edit section… and the settings below.
- For a free shape — only the Advanced buttons at the bottom, so without Advanced tools the block isn't shown.
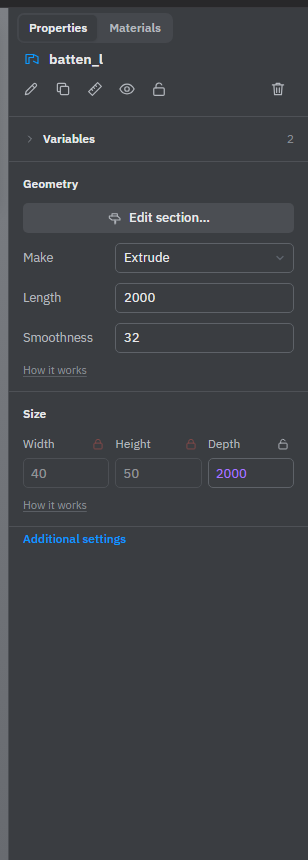
How a profile is made
Make chooses how the section becomes a part:
- Extrude — the section is pulled along a straight Length.
- Revolve — the section turns around the vertical axis by Angle, ° (360 for a full ring). From axis moves the section away from the axis, so you get a ring instead of a solid.
- Sweep — the section follows a Path, with mitred corners: railings, frames, greenhouse arches, handrails.
For a sweep, Path offers Polyline, Rectangle, Arch, Circle and Helix, each with its own sizes. A polyline lists its Points X, Y, Z; Add point adds one and Closed path joins the last point to the first. An arch has a Shape: Round or Elliptic. Turn section, ° turns the section around the path. Smoothness sets how many facets round parts get.
The length and path fields take a formula of the group's size, such as =parent.X, so a rail follows its frame when the frame stretches. See Variables and formulas.
Subtract, merge, keep the overlap
With Advanced tools on, three more buttons sit at the bottom of the block:
- Subtract from overlapping shapes — the selected part cuts its form out of every part it overlaps. The selected part stays.
- Merge selected parts — Shift+click the parts first. The first one selected keeps its name and place; the others are glued or welded into it. They must touch.
- Keep only the overlap — the selected part keeps only what it shares with the parts it overlaps, and those parts go.
More in Merge and subtract.
Made, bought or display only
Each part or group also says how it goes into the documents. To set it, select the object, click the pencil (Rename) at the top of Properties and choose In documents:
- Made — in the specification, cutting maps, drawings and materials. This is the default.
- Bought — only in the specification, as an item. A bought group is one item as a whole.
- Display only — in no documents. Use it for things that are only there for the look, such as a fridge or a vase.
A group decides for everything inside it: inside a group set to Display only, nothing reaches the documents. In the Elements list, bought and display-only objects carry a small bought or display tag. A part saved as a project part has its own In documents field in its Part details.
See also: Library and catalog, Materials and decors, Jigsaw and bar section, Merge and subtract.